Welcome!

Creating recipes isn't a pastime—it's a passion. And a lot of fun.

The rules are few: Use 99% fresh ingredients (or thereabouts); make the dish simple but flavorful; make the dish flavorful but simple; be creative, not silly.

With this blog, I want to share new recipes, along with tips on ingredients and preparation, and, hopefully, show new cooks (and non-cooks) the pleasure in setting the table with a delicious homemade meal. The Briny Lemon is about fresh, simple, flavorful ingredients and easy cooking methods that help you bring the best to your family table. Your comments are welcome!

Monday, July 30, 2012

Slow-Cooker, Fresh-Tomato Marinara


Homemade marinara is one of the simplest, most flavorful and satisfying dishes you can make. Few ingredients and ample time—that’s all it takes.

Choose large tomatoes to make the peeling easier, and use Italian tomato paste, if possible. Fresh marinara is a very versatile sauce. It puts the Italian in pasta, of course, but you also can spoon it over grilled chicken breasts or roast beef, add rich flavor to slices of grilled eggplant, or use it as the base for one tasty pizza pie.

One note: this recipe is for marinara—because it includes garlic, onion, and herbs. For a basic tomato sauce (tomatoes, paste, and salt only), see Slow-Cooker Heirloom Tomato Sauce.

Makes 5-6 cups

Ingredients
  • 5 lbs large tomatoes, such as beefsteak, stem, or large romas, peeled and cut into small chunks
  • 3 garlic cloves, finely chopped
  • 1/2 small onion, finely chopped
  • 2/3 cup Italian tomato paste
  • 1/4 cup chopped flat-leaf parsley
  • sea salt
  • freshly ground black pepper
Marinara Ingredients
Preparation
  1. Place the first 5 ingredients in a slow-cooker and stir to combine. Season with salt and pepper and cook over high heat for 3 hours.
Marinara Ready to Cook
Marinara after 3 Hours
  1. Reduce the heat to low and cook an additional 3 hours. Remove the lid and cook 2 hours longer, stirring occasionally, until the sauce is slightly thickened. Season with additional salt, if needed.
Slow-Cooker Marinara
Use within 2 days if refrigerated, or freeze in an airtight container for a few months.

Italian Beef Sandwiches with Giardiniera


You don’t need to frequent Italian eateries in Chicago to get a great Italian beef sandwich served with savory pan juices and topped with hot giardiniera. Create your own and enjoy the authentic tastes of this classic meat and vegetable sandwich straight from your own kitchen.

The sandwich is often made with top round or rump roast, but in this recipe I made it with inexpensive chuck roast. The secret is not to braise the roast long enough for it to fall apart, but to pull it from the oven and chill it so that it can be cut it into very thin slices.

Two keys to this flavorful dish: tender, juicy beef braised in a rich, savory broth and sliced ultra-thin; and the robust, pickled vegetable medley called giardiniera (jar-di-nee’-ra) made one to two days in advance to give the flavors time to meld and develop.

“Giardiniera” means “from the garden” in Italian, and it’s good to take that as literally as possible. The mixture of garden fresh vegetables—commonly including spicy serrano or jalapeno chiles, cauliflower, bell peppers, carrots, and celery—is first brined in a simple water-salt solution, then pickled in a blend of vinegar, oil, olives, and spices. Time is a main ingredient as well. Give it plenty—the flavors only get better.

Giardiniera Vegetables
Be aware that this sandwich gets messy—and that’s a good thing. Choose a sturdy, chewy, crusty bread like baguette to soak up the beefy pan juices and oil from the giardiniera. The roll will still get a bit soggy and, yes, some of the giardiniera and beef slices will fall off. Again, all good. Enjoy the flavors and smile about the rest.
  
Serves 4-5

Ingredients

For the Giardiniera
  • 1/3 cup salt
  • 1 cup water, plus more
  • 3 serrano chiles, thinly sliced
  • 1 small celery rib, sliced vertically in half and finely chopped
  • 1 cup very small cauliflower florets
  • 1/2 cup thin slices of peeled, baby-cut carrots
  • 1/2 small green bell pepper, chopped
  • 1/2 small red bell pepper, chopped
  • 1/2 small yellow bell pepper, chopped
  • 1/4 small red onion, chopped
  • 2 garlic cloves, finely chopped
  • 1/3 cup thinly sliced pitted, green olives
  • 1 tsp dried oregano
  • 1 tsp red pepper flakes
  • 1/2 cup olive oil
  • 1/2 cup white vinegar
For the Beef
  • 2 tbsp olive oil
  • 2 1/2 lb beef chuck roast
  • 1 tbsp dried oregano
  • 2 tsp garlic powder
  • 1 tsp dried rosemary or dried basil (or a mixture)
  • sea salt
  • freshly ground black pepper
  • 1 14.5-oz can low-sodium beef broth
  • 1 tbsp Worcestershire sauce
  • 4-5 warmed, crusty baguette rolls, sliced open but not separated into tops and bottoms 
Preparation

For the Giardiniera
  1. In a small bowl, dissolve the salt in 1 cup of water.
  2. In a medium bowl, combine the serrano chiles and next 7 ingredients (through red onion). Pour the salt solution over the vegetables and add enough water to cover. Cover with plastic wrap and refrigerate overnight. 
Mixed Giardiniera Vegetables
Giardiniera Vegetables in the Brine
  1. Drain and rinse the vegetables in a colander or large sieve. Rinse out the bowl.
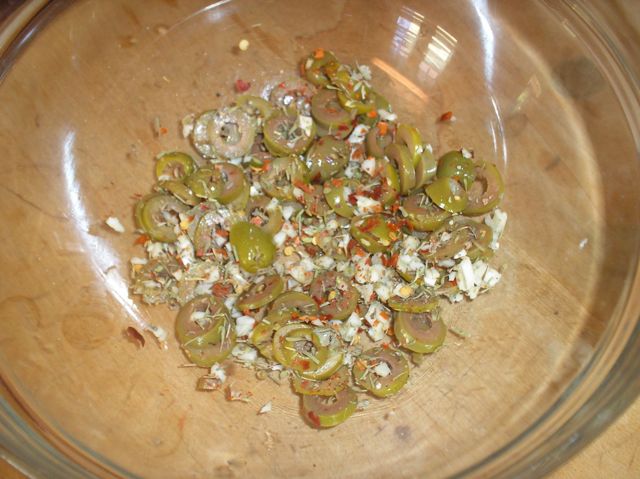
  2. Add the garlic, olives, oregano, and pepper flakes to the bowl. Stir in the brined vegetables. Pour the oil and vinegar over the mixture and stir well to combine. Cover with plastic wrap and refrigerate at least 8 hours (or overnight). Bring to room temperature before using.
Olive Mixture for Giardiniera
Giardiniera in Pickling Mixture
Giardiniera
For the Beef
  1. Preheat the oven to 250° F.
  2. Heat a Dutch oven over medium-high heat and add the olive oil. Season the roast on both sides with the oregano, garlic powder, rosemary, salt, and pepper. Sear until beginning to brown, about 5 minutes per side.
  3. Pour the beef broth and Worcestershire sauce around the roast and cover tightly. Braise in the oven 2 hours for medium doneness.
  4. Remove the roast to a plate and cool. Cover and refrigerate until cold, about 1 hour.
Beef Beginning to Brown
Beef in Broth Ready to Braise
Beef Cooling
  1. Let the pan juices cool then strain into a medium bowl. Cover and refrigerate 1 hour. Gently warm the beef juices in a medium saucepan.
Strained Pan Juices
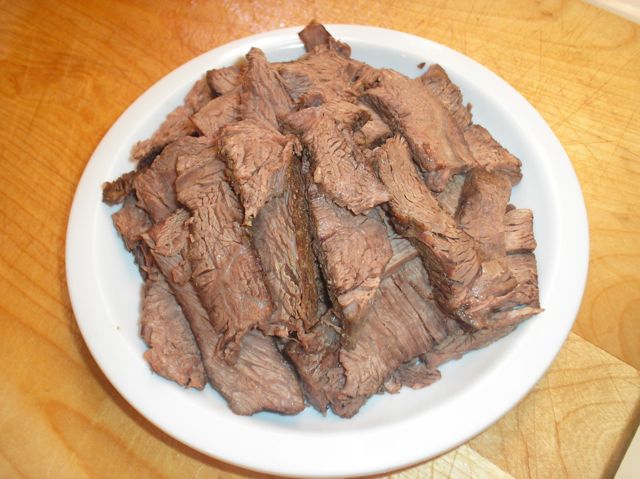
  1. Remove the beef from the refrigerator and cut across the grain into very thin slices, discarding fat. Place the beef slices in the pan with the pan juices until heated throughout.
Thinly Sliced Beef
Sliced Beef Returned to Pan Juices
To serve, divide and stack beef slices in the warm baguette rolls and top each generously with giardiniera.

Italian Beef Sandwich with Giardiniera

Save leftover giardiniera to top brioche or as a relish for grilled chicken or pork chops. It will keep 4-5 days, covered, in the refrigerator.  


Thursday, July 26, 2012

Grilled Beef Fajitas with Guacamole and Hot Pico de Gallo


Both Mexico and Texas lay claim to fajitas—a simple dish of tortilla-wrapped grilled or seared meats and vegetables (usually peppers and onions), served with tomato-based salsas and guacamole. While the dish originated in Mexico, the now-commonplace additions of shredded cheese and sour cream give it more Tex-Mex flair. Regardless of who created them, fajitas are simple, flavorful, and easy to make—and served in the pan they’re cooked in.


I like to make fajitas with the freshest and simplest of ingredients, from the pico de gallo to the guacamole to the peppers, onion, and lean meat. I also like a lot of color, so I used green, red, and orange bell peppers in this recipe. Of course, you can make the dish with only one color of pepper—but if the opportunity is there for a variety of hues, take it.

Peppers and Onion
To keep it fresh and simple, the salsa includes a few chopped vegetables, cilantro, and lime juice. That’s it. Same for the guacamole: avocado, garlic, salt, and lime juice. That leaves only the fajita filling: sliced peppers and onions with small pieces of meat. If you prefer not to eat beef, try chicken or turkey instead. Make it vegetarian with the addition of thin slices of crunchy jicama or even fresh corn kernels.

Also check out Turkey Fajitas with Grilled Peppers and JalapeƱo-Cheese Sauce.

Pico de Gallo Ingredients
Guacamole Ingredients
Makes 8 fajita wraps


Ingredients


For the Pico de Gallo

  • 3-4 plum tomatoes (depending on size), chopped
  • 2 small jalapeno chiles, finely chopped
  • 1 habanero chile, finely chopped
  • 1/4 small red onion, chopped
  • 1/4 cup chopped cilantro
  • juice of 1 lime
  • sea salt
For the Fajitas and Guacamole
  • olive oil, for brushing
  • 1 lb beef steak (such as New York strip, flank, or rib-eye), cut across the grain into thin, short strips
  • sea salt
  • freshly ground black pepper
  • 1 small onion, cut into thin vertical strips
  • 1/2 medium green bell pepper, cut into thin, 1-inch strips
  • 1/2 medium red bell pepper, cut into thin, 1-inch strips
  • 1/2 medium orange or yellow bell pepper, cut into thin, 1-inch strips
  • 2 garlic cloves
  • 1 large, ripe avocado
  • juice of 1/2 lime
  • 8 8-inch, flour tortillas (fajita size), warmed
  • shredded Chihuahua or white cheddar cheese (optional)
  • sour cream (optional)
Preparation

For the Pico de Gallo
  1. Combine the first 6 ingredients (through juice) in a medium bowl and season with salt. Let stand to allow flavors to blend while you prepare the other dishes.

Pico de Gallo
For the Fajitas and Guacamole
  1. Heat a grill pan over medium-high heat and brush with oil. Season the beef with salt and pepper and grill, stirring and turning often, until barely cooked through, 6-7 minutes. Remove to a bowl and wipe out any accumulated liquid in the pan.
Beef Ready to Grill
Beef Beginning to Grill
Grilled Beef
  1. Brush the pan with more oil and add the onion and all bell peppers. Season with salt and pepper and grill, stirring frequently, until slightly softened and beginning to char, 5-6 minutes.
  2. Return the beef to the pan and stir into the vegetables until hot and sizzling, 1-2 minutes.
Peppers and Onion Beginning to Grill
Grilled Peppers and Onions
Beef Returned to the Pan
  1. Meanwhile, coarsely chop the garlic cloves and place in a shallow bowl. Season generously with salt, then use a fork to mash the salt and garlic together until a pulp forms.
  2. Slice the avocado in half lengthwise and remove the pit. Scoop the flesh into the bowl with the garlic-salt pulp and add the lime juice. Mash the avocado into the mixture until creamy but still slightly stiff.
To serve, stack 2-3 heavy potholders in the middle of the dining table. Set the grill pan on top and place the tortillas, pico de gallo, guacamole, and any other accompaniments around it to let your guests make their own fajitas.


Sunday, July 22, 2012

Irish Bangers and Mash-Cakes with Whiskey Cheese


This recipe is a fun take on Bangers and Mash, a pub-food favorite of the UK, particularly in England and Ireland. “Bangers” means sausages, supposedly deriving their name from the popping and “banging” of the meat as it fries at high temperatures. Here, I pan-grill the sausages to cut down on some fat. If you can’t find actual Irish bangers—typically made with pork shoulder, breadcrumbs, and savory spices—your favorite sausage will work fine.


Irish Banger Sausages
Traditional bangers and mash recipes call for simple mashed potatoes served with the sausages, along with gravy and green peas as the usual accompaniments. In this recipe, I skip the gravy altogether, and put a splash of green on the plate with slices of heirloom green-striped tomatoes. A sprinkle of salt is all they need.

I’m calling the potatoes in this dish “mash-cakes” because the mashed potatoes are formed into cakes and fried, but the creamy Irish whiskey cheese keeps the consistency as soft as mashed potatoes. It also will make plenty of liquid in the skillet, keeping the cakes from becoming crispy and golden brown on the outside—and also adding to the soft consistency inside.

The cakes develop a deliciously cheesy, nutty, salty flavor, with just a hint of whiskey. I used Kerrygold whiskey cheese (aged cheddar), but if you want to forego the added liquor, try a Dubliner cheese—still rich and creamy, without the alcohol.


Whiskey Cheese 
Finely Grated Whiskey Cheese
For a more traditional potato cake recipe, try Grilled Beef with Creamy Fried Potato Cakes.

Serves 2

Ingredients
  • 2 medium russet potatoes (about 1 lb), peeled and cut into 1-inch chunks
  • 3 tbsp milk
  • 1 tbsp unsalted butter
  • sea salt 
  • 1 oz Irish whiskey cheese (or other aged cheddar), finely grated
  • 1 tbsp finely chopped red onion
  • 1 tbsp flour, plus more for dredging
  • 2 Irish banger sausages (or other sausages), about 2/3 lb total
  • 1 tbsp canola oil, plus more for brushing
  • slices of heirloom green-striped tomatoes, optional
Preparation
  1. Place the potatoes in a medium pot and cover with water. Bring to a boil, then reduce the heat and simmer until the potatoes are tender, about 10 minutes.
  2. Drain the potatoes and return to the pot. Add the milk and butter and season with salt. Mash until smooth but slightly stiff. Turn the mashed potatoes out into a bowl and let cool completely.
Mashed Potatoes
  1. Add the cheese, onion, and 1 tablespoon of flour and mix with a spoon until all the ingredients are well incorporated.
  2. With damp hands, form the potato mixture into 4 cakes, about 3 inches in diameter. (The potatoes will be sticky, so dampen your hands a few times.) Lay the cakes on a plate and refrigerate, uncovered, 30 minutes. (Refrigeration helps them hold their shape during frying.)
Mash-Cakes Ready to Chill
  1. Scatter flour on a work surface and press each side of the cakes into it. Heat a medium, nonstick skillet over medium-high heat and add 1 tablespoon of oil. Add the cakes to the skillet and season with salt and pepper. Fry until beginning to brown on the bottom side, 8-9 minutes. (The skillet may become watery—let the liquid evaporate as the potatoes cook.)
  2. Carefully turn the cakes over and fry until the second side begins to brown, 7-8 minutes. (If the cakes lose shape during turning, simply form them back into circles with your spatula.)
Mash-Cakes Beginning to Fry
Cooked Mash-Cakes
  1. Meanwhile, heat a grill pan over medium-high heat and brush with oil. Prick the sausages all over with a fork and grill, turning on all sides, until golden brown and just cooked through, about 15 minutes total. Remove to a cutting board and let rest 3 minutes.
Bangers Beginning to Grill
Grilled Bangers
To serve, place 2 mash-cakes on each of 2 plates. Slice each banger on the diagonal in half and divide between the plates. Serve with slices of green tomato on the side, if desired.  

Thursday, July 19, 2012

Spicy Shrimp Pad Thai


Pad Thai is the signature dish of Thailand and one of the most delicious dishes anywhere in the world. Of course, there are countless recipes for it, but the basics are the same: rice noodles softened in hot water to a chewy texture; scrambled eggs; bean sprouts; and a bold, sour sauce flavored with tamarind, fish sauce, and acidities, whether vinegar or lime juice. Other common ingredients include garlic, scallions, and tofu, and a protein such as shrimp or chicken.

Pad Thai Ingredients (Minus the Shrimp)
I like to add spice to anything Asian (or anything, period) so I included some Thai chiles in the stir-fry and a little chile-garlic condiment in the sauce. The result is a tangy, sour finish with distinct Thai taste and heat—a flavorful combination that distinguishes itself from typical stir-fry dishes.

You can find jars of tamarind concentrate (simply a mixture of tamarind fruit juice and water) at Asian and Indian markets. (If you’re not familiar with it, tamarind is what makes Worcestershire sauce taste like Worcestershire sauce.) Its wonderful sour flavor brings the depth and tanginess to authentic Pad Thai. 

Sauce Ingredients
Rice noodle sticks may look like white pasta, but they cook by soaking in hot water, not boiling. The consistency should be just slightly soft but still chewy—firmer than typical “al dente” pasta.

Ingredients

For the Sauce
  • 1/2 cup tamarind concentrate
  • juice of half a medium lime
  • 3 tbsp fish sauce
  • 2 tbsp white sugar
  • 1 tbsp chile-garlic sauce
For the Shrimp Pad Thai
  • 4 oz rice noodles (sticks)
  • 2 tablespoons peanut oil, divided
  • 4-5 oz cubed tofu
  • 3 scallions, white and light green parts only, thinly sliced
  • 3 garlic cloves, finely chopped
  • 3 red Thai chiles, finely chopped
  • 2 whole eggs, beaten
  • 1/2 lb peeled, deveined, large shrimp (26–30 count)
  • 3 ounces bean sprouts
  • 1/2 cup roasted, salted peanuts, divided
  • 4 lime wedges
  • cilantro leaves, for garnish
Preparation

For the Sauce 
  1. Combine all ingredients in a bowl and stir well until the sugar dissolves. 
Pad Thai Sauce 
For the Shrimp Pad Thai
  1. Bring a pot of water to a slight boil. Remove from the heat and add the rice noodles. Let soak 15 minutes. Drain and rinse under cold water.
  2. Heat a wok over high heat and add 1 tablespoon of oil. When the oil shimmers, add the tofu and stir-fry until golden brown, about 5 minutes. Transfer to a bowl.
Stir-Fried Tofu
  1. Add the remaining 1 tablespoon of oil to the wok and heat until shimmering. Add the scallions, garlic, and chiles and stir-fry 1 minute.
Stir-Fried Scallion, Garlic, and Chile
  1. Push the garlic mixture to the side of the wok and add the eggs. When the eggs begin to set, stir-fry until loosely scrambled, about 20 seconds.
Stir-Fried Eggs
  1. Add the drained noodles and stir-fry 1 minute.
Drained Noodles Added
  1. Return the tofu to the wok and add the shrimp, bean sprouts, and half the peanuts. Stir-fry until the shrimp is almost cooked through, about 2 minutes.
  2. Add the sauce and stir until slightly thickened, 1 minute.
Stir-Fry with Sauce Added
To serve, divide the Pad Thai among 4 bowls and garnish with the remaining peanuts, lime wedges, and cilantro. 


Thursday, July 12, 2012

Stir-Fried Chicken and Vegetables with Spicy Coconut Sauce


Recipe updated August 2015

Stir-fry is a staple in my house. It’s the perfect method to bring out the best tastes and textures of fresh vegetables and thin pieces of meat or poultry—and it allows for limitless sauce recipes with bold, rich flavors and whatever amount of heat you prefer. At home, that means hot. But only if it's flavorful as well. Heat for the sake of heat, without taste, is...just heat. 

I added coconut milk to balance the hot and sour sauce with a little creamy sweetness. The combination of flavors is just enough to highlight the fresh vegetables and chicken without overpowering them.

Serves 4

Ingredients

For the Sauce
  • 1/2 cup coconut milk
  • 1/4 cup soy sauce
  • 2 tbsp fresh lime juice
  • 1 tbsp fish sauce
  • 1 tbsp sambal oelek (ground fresh chile paste)
  • 1 tbsp brown sugar
  • 1 tbsp cornstarch
  • 1 tbsp peanut oil
  • 3 red Thai chiles, finely chopped
  • 2 garlic cloves, finely chopped
  • 1-inch piece of ginger, peeled and finely chopped

For the Chicken and Vegetables
  • 2 tsp cornstarch
  • 1 lb boneless, skinless chicken thighs, cut into thin 2-inch strips
  • 2 tbsp peanut oil, divided
  • 3 scallions, white and light green parts only, cut into 1-inch pieces
  • 2/3 cup coarsely chopped red bell pepper
  • 6 oz thin asparagus stalks, cut into 2-inch pieces
  • steamed white rice, for serving
  • chopped cilantro, for garnish

Prepared Chicken
Vegetables, Garlic, and Ginger
Preparation

For the Sauce
  1. Combine the coconut milk and next 6 ingredients (through cornstarch) in a bowl, stirring well to dissolve the cornstarch. Set aside.
  2. Heat a wok over medium heat and add the peanut oil. Add the chiles, garlic, and ginger and stir-fry 1 minute.
  3. Add the coconut milk mixture and bring to a simmer. Reduce the heat to low and cook until thickened, stirring constantly, 2-3 minutes. Transfer the sauce to a bowl and set aside.
  4. Wipe out the wok.

Chile, Garlic, and Ginger
Sauce Beginning to Cook
Thickened Sauce
Spicy Coconut Sauce
For the Chicken and Vegetables

  1. Place the cornstarch in a heavy, sealable plastic bag. Add the chicken, close the bag, and shake to coat well.
  2. Re-heat the wok over medium-high heat. Add 1 tablespoon of peanut oil, swirling to coat.
  3. Shake excess cornstarch off the chicken pieces and add to the pan. Stir-fry until tender and just cooked through, 7-8 minutes. Transfer the chicken to a bowl and discard any remaining liquid.
  4. Add the remaining 1 tablespoon of peanut oil to the wok and add the scallions and bell pepper. Stir-fry 2 minutes. Add the asparagus and stir-fry 3 minutes.
  5. Return the chicken to the wok and add the sauce, stirring to coat and combine, 1 minute.    

Chicken Beginning to Cook
Cooked Chicken
Scallion and Bell Pepper 
Asparagus Added
Chicken and Sauce Returned
Divide the rice among 4 shallow bowls and divide the chicken mixture on top. Garnish with cilantro and serve right away.

Stir-Fried Chicken and Vegetables with Spicy Coconut Sauce