Welcome!

Creating recipes isn't a pastime—it's a passion. And a lot of fun.

The rules are few: Use 99% fresh ingredients (or thereabouts); make the dish simple but flavorful; make the dish flavorful but simple; be creative, not silly.

With this blog, I want to share new recipes, along with tips on ingredients and preparation, and, hopefully, show new cooks (and non-cooks) the pleasure in setting the table with a delicious homemade meal. The Briny Lemon is about fresh, simple, flavorful ingredients and easy cooking methods that help you bring the best to your family table. Your comments are welcome!

Thursday, February 27, 2014

Pan-Seared Chicken Pasta with Roasted Pepper and Mozzarella


Lean chicken breasts, a simple tomato-based sauce with roasted bell pepper, and creamy fresh mozzarella combine with rotini for a quick, light, and satisfying dinner for four. Cook the chicken and sauce in the same pan, toss with the pasta, and give the cheese a few minutes to begin to melt—ready to serve.

Fresh mozzarella balls come in a variety of sizes, from the common jumbo-egg-sized (about four ounces each) to small pearls, about a half-inch in diameter. For this recipe, I used cherry-sized pearls, sometimes sold as ciliegine (“cherry” in Italian), and simply dropped them into the sauce about five minutes before serving time.

Cherry-Sized Mozzarella Balls
Serves 4

Ingredients
  • 1 large yellow bell pepper, halved lengthwise and seeded
  • 6 oz mini rotini
  • 2 tbsp olive oil, divided
  • 1 lb chicken breast tenders
  • sea salt
  • freshly ground black pepper
  • 1 medium shallot, finely chopped
  • 1 garlic clove, finely chopped
  • 1 14.5-oz can organic diced tomatoes, drained
  • 1 cup chicken broth
  • 1 tbsp red wine vinegar
  • 5 oz cherry-sized mozzarella pearls (or larger, cut into pieces), about 3/4 cup
  • thyme leaves, for garnish
Preparation
  1. Preheat the broiler.
  2. Place the bell pepper halves cut-side-down on a foil-lined baking pan and broil until the skin is blackened and blistered, 10-12 minutes. Transfer to a paper bag, close tightly, and steam the pepper 15 minutes. Peel the skin from the flesh and cut the pepper into thin strips.
Blistered Pepper
Peeled Pepper 
Sliced Pepper
  1. Cook the rotini in boiling, salted water until al dente, 6-7 minutes. Drain.
  2. Heat a large, deep skillet over medium-high heat and add 1 tablespoon of olive oil. Season the chicken with salt and pepper and sear until browned and just cooked through, 5-6 minutes per side.
  3. Transfer to a cutting board and let rest 5 minutes (do not wipe out the skillet). Cut diagonally into thin strips.
Chicken Beginning to Sear 
Let the Chicken Rest
  1. Reduce the heat to medium and add the remaining 1 tablespoon of oil to the skillet. Add the shallot and garlic and cook 1 minute, scraping up brown bits.
  2. Add the tomatoes, chicken broth, and vinegar and season with salt and pepper. Cook 5 minutes.
  3. Add the cooked chicken, rotini, roasted pepper, and mozzarella and stir until hot throughout and the cheese begins to melt, about 5 minutes.
Shallot and Garlic
Tomato Mixture Added
Pasta Ready to Plate
Divide the pasta and sauce among 4 bowls and garnish with thyme leaves. Serve hot.


Pan-Seared Chicken Pasta with Roasted Pepper and Mozzarella

Wednesday, February 26, 2014

Coffee-Rubbed Roast Beef Sandwiches with Wasabi Cream Spread


Take roast beef sandwiches to a new level with a simple, rich, and aromatic rub—and an overnight rest in the fridge. Ground coffee beans impart depth and richness to a dry rub. Add chile, mustard, and onion powders to the coffee for an especially flavorful crust on a lean eye-of-round beef roast.

Three key tips for this dish:

1) Don’t overcook. A meat thermometer is a very useful tool for cooking the roast. If you don’t have one, you can trust the cooking time as long as you have a two-pound eye-of-round roast, about four inches in diameter (and provided you know the quirks of your oven inside and out).

Eye-of-Round Roast
Either way, don’t be alarmed by the juices flowing from the cooked roast while it’s resting. When you remove it from the oven at 125°, the juices will appear very bloody at first. Within 15-20 minutes, the juices will darken as the internal temperature continues to rise.

The bottom line here is that you want the roast to be very pink in the middle. A medium-rare finish assures maximum flavor and tenderness.

2) Chill. We’re making sandwiches here, so cold roast beef is okay. An overnight stay in the fridge allows the rub to penetrate the meat even more for deeper flavor.

3) Slice very thinly. Think shavings. But unless you have a deli meat slicer, you won’t be able to go that thin—just get as close to it as possible with a very sharp knife. The slices should fold easily and be very tender. 

Slice the Roast Very Thinly
I made a simple spread of sour cream and wasabi paste to top the beef. A good grainy mustard would work well too.

And for another coffee-rub dish, check out Skillet-Seared, Coffee-Rubbed Lamb Chops with Honey-Butter.

Serves 6

Ingredients
  • 1 tbsp finely ground coffee granules
  • 1 tsp chile powder
  • 1 tsp mustard powder
  • 1 tsp onion powder
  • 1 tsp sea salt, plus more
  • 2-lb eye-of-round beef roast
  • 1/3 cup sour cream
  • 2 tsp wasabi paste
  • freshly ground black pepper
  • 12 slices thin, light rye bread
  • tomato and red onion slices, and lettuce leaves (optional)
Preparation
  1. Preheat the oven to 425° F. Line a small baking pan with foil.
  2. Combine the coffee, chile, mustard, and onion powders and salt in a small bowl. Massage the coffee mixture evenly all over the roast.
  3. Place the beef in the pan and roast 20 minutes, turning once after 10 minutes.
  4. Reduce the oven temperature to 300° F. Continue roasting the beef until a thermometer registers 125° F, about 30 minutes. 
  5. Transfer the roast to a plate or work surface and let stand at room temperature 30 minutes.
  6. Wrap the roast in parchment paper, then tightly in plastic wrap. Refrigerate at least 8 hours, or overnight.
Rub Mixture
Rubbed Roast 
Roast after Turning
Roasted Eye-of-Round 
Chilled Roast
  1. About 30 minutes before serving, combine the sour cream and wasabi paste in a bowl and season with salt and pepper.
Sour Cream and Wasabi
Wasabi Cream
Slice the roast as thinly as possible and stack on slices of rye bread. Spread with wasabi cream and top with tomato, onion, and lettuce, if desired.


Sliced Beef
Beef and Wasabi Spread
Coffee-Rubbed Roast Beef Sandwiches with Wasabi Cream Spread

Saturday, February 22, 2014

Pan-Seared Tuna with Stir-Fried Vegetables


Vibrantly colored, fresh ahi (yellowfin) tuna steaks are as meaty as a juicy rib-eye. Well, almost. And as with any good cut of beef, overcooking is nothing short of a sin. Also like a beef steak, a thick cut of ahi benefits most from a quick sear at a high temperature with only a brush of oil. Cast-iron is your best friend for this preparation.

Ahi Tuna Steaks
For this recipe, I went with a combination of Thai, Japanese, and Chinese flavors and ingredients. The simple vegetables need only a quick stir-fry and an aromatic sauce to complement the tender tuna with mildly sweet-and-sour flavor. After a 20-minute marinade for the tuna, this dinner is on the table in less than 10 minutes.

Note: There is no added salt in this recipe. Plenty in the sauce ingredients!

Serves 2

Ingredients
  • 2 tbsp soy sauce, divided
  • 2 tbsp fish sauce, divided
  • freshly ground black pepper
  • 2 5-oz ahi tuna steaks, about 1 inch thick
  • 2 tsp sake or dry sherry
  • 2 tsp light brown sugar
  • 1 tsp rice vinegar
  • 1 tsp fresh lime juice
  • peanut oil, for brushing, plus 1 tbsp
  • 1 small garlic clove, finely chopped
  • 1 small piece of ginger, peeled and finely chopped
  • 4 oz shiitake mushrooms, sliced
  • 1 very small zucchini, cut into short matchsticks
  • 1 small stalk of baby bok choy, chopped (including leaves)
Stir-Fry Vegetables, Ginger, and Garlic 
Prepped Stir-Fry Mixture
Preparation
  1. Combine 1 tablespoon of soy sauce and 1 tablespoon of fish sauce in a sealable plastic bag and season with black pepper. Add the tuna steaks, seal the bag, and turn several times to coat the fish. Let stand at room temperature 20 minutes.
Marinating Tuna
  1. Combine the remaining 1 tablespoon of soy sauce and 1 tablespoon of fish sauce, sake, sugar, vinegar, and lime juice in a bowl. Stir well to dissolve the sugar.
  2. Heat a cast-iron or other heavy skillet over medium-high heat and brush with peanut oil.
  3. Remove the tuna steaks from the marinade, letting excess drip off. Sear until slightly charred on the bottom, 3-4 minutes. Turn and sear 2-3 minutes longer, until slightly charred on the other side and pink in the middle for medium-rare.
Tuna Beginning to Sear
Tuna after Turning 
Pan-Seared Tuna
  1. Meanwhile, heat a wok or deep skillet over medium-high heat and add the peanut oil, swirling to coat. Add the garlic and ginger and stir-fry 30 seconds.
  2. Add the mushrooms, zucchini, and bok choy and stir-fry 2 minutes.
  3. Add the reserved sauce and cook until hot throughout, 2 minutes.
Ginger and Garlic 
Vegetables Beginning to Stir-Fry 
Vegetables with Sauce
Plate the tuna steaks and spoon the vegetable mixture overtop and alongside. Spoon sauce from the wok over all and serve right away.

Pan-Seared Tuna with Stir-Fried Vegetables

Friday, February 21, 2014

Three-Bean Soup with Smoked Kielbasa and Kale


This simple, downhome bean soup is packed with both nutrition and flavor. We all know beans provide an ample amount of vitamins and fiber, and they’re a cinch to cook from scratch—it takes a bit of time but little effort.  

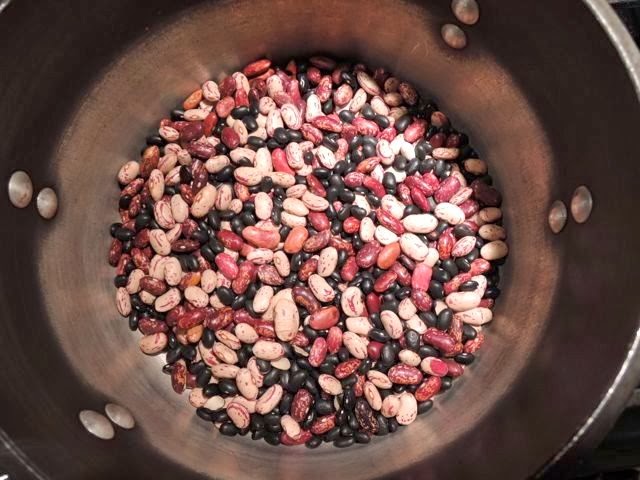
For this recipe, I used cranberry beans (because they’re pretty), tongues of fire beans (because I like the name), and good ol’ black beans (because they’re good ol’ black beans). You can use any dry beans you like—just be sure they have similar cooking times so that their finished textures will be the same too (not a mixture of mushy and crunchy).

Cranberry, Black, and Tongues of Fire Beans
Even if you go for the visual appeal of pink-and-white-striped cranberry beans, be aware that the colors will fade and blend during cooking anyway—especially when paired with black beans, which tend to turn any broth murky brown.

To add to the dish’s nutritional value and earthy flavor, I added a healthy dose of green kale. Smoky kielbasa also kicks up the flavor (not so much the nutritional value), but you can make this soup vegetarian by omitting the sausage and substituting vegetable broth for the chicken broth.

Either way, it’s a tasty, satisfying dinner you can feel good about.

Note: Normally, I wouldn't add fresh herbs until toward the end of cooking, but I think thyme and beans go so well together that I wanted the herbal flavor to penetrate the veggies and broth start to finish. But if you're a purist, don't add the thyme until you add the kielbasa.

Serves 6

Ingredients
  • 2/3 cup dry black beans
  • 2/3 cup dry cranberry beans
  • 2/3 cup dry tongues of fire beans
  • 2 tbsp olive oil
  • 1/2 cup finely chopped onion
  • 1/2 cup finely chopped peeled carrot
  • 1/2 cup finely chopped celery
  • 2 garlic cloves, finely chopped
  • 1-1/2 tbsp fresh thyme leaves
  • sea salt
  • freshly ground black pepper
  • 6 cups chicken broth
  • 1/2 lb smoked kielbasa, thinly sliced
  • 3 packed cups chopped green kale
  • toasted breadsticks, for serving (optional)
Smoked Kielbasa
Sliced Kielbasa
Preparation
  1. Sort and rinse all beans. Place them in a large pot and cover with water by 1 inch. Soak overnight.
  2. Transfer the beans to a colander and drain. Rinse thoroughly under cold water and drain again.
Bean Mixture
Beans Beginning to Soak
Drained Beans
  1. Heat a large soup pot over medium heat and add the oil. Add the onion, carrot, celery, and garlic and cook until beginning to soften, about 5 minutes.
  2. Add the drained beans and thyme and season with salt and pepper. Stir well to combine.
  3. Add the broth and bring to a boil. Reduce the heat to low and simmer slowly 1-1/2 hours. (Set the pot lid slightly ajar if the soup continues to boil when covered.)
Onion Mixture 
Beans and Thyme Added
  1. Add the kielbasa and continue simmering, 15 minutes, until the beans are tender.
  2. Add the kale and cook until wilted, 3-4 minutes. Taste for seasoning before serving. 
Kielbasa Added 
Kale Added 
Cooked Soup

To serve, divide the soup among 6 bowls and serve crusty breadsticks alongside, if desired.

Three-Bean Soup with Smoked Kielbasa and Kale

Thursday, February 20, 2014

Slow-Cooked-Pork Rolls with Ranchero Sauce


Most often, it’s the simplest ingredients and the simplest preparation that result in the most flavorful, welcoming dishes you can take to the dinner table. This is one of them.

Slowly cooked pork roast is succulent on its own, even when it’s on a sandwich. Dress it up with rich, smoky ranchero sauce and melt a little cheese over it to turn these simple baked sandwich rolls into one delicious dish.  

I added plenty of garlic to the braising ingredients because…well, it’s garlic, but you can use as much (or as little) as you like.

I’m a firm believer that ranchero sauce is a natural accompaniment to pulled pork, and it really is easy to make. If you don’t want to go that route, a savory marinara would make a tasty topping as well.

Note: There's a lot of pork here, so brown the pieces in two batches in order to ensure nice color. If you shove it all in together, the meat will steam (and turn grayish) instead of brown.

Serves 6

Ingredients
  • 2 tbsp olive oil, divided
  • 3 lbs pork shoulder (Boston butt), trimmed and cut into 3-inch pieces
  • sea salt
  • freshly ground black pepper
  • 6 garlic cloves, smashed and peeled
  • 1 tsp chile flakes     
  • 2 cups vegetable or chicken broth   
  • 6 soft 6-inch rolls (such as hoagie buns), centers hollowed out of both tops and bottoms
  • 1 recipe ranchero sauce, warmed
  • 1-1/2 cups shredded monetary jack cheese
Pork Shoulder Roast
Pork Pieces
Hollow Out the Rolls
Ranchero Sauce
Preparation
  1. Preheat the oven to 275° F.
  2. Heat a Dutch oven (or heavy, ovenproof pot) over medium-high heat and add 1 tablespoon of oil. Add half the pork and season with salt and pepper. Sear until beginning to brown, 3-4 minutes per side. Transfer the 1st batch to a plate and repeat with the remaining 1 tablespoon of oil and pork. (Do not remove the 2nd batch.)
  3. Return the 1st batch of pork to the pot and scatter the garlic cloves around it. Sprinkle with chile flakes and add the broth. Bring to a simmer.
  4. Cover the pot tightly and place in the oven. Braise the pork until fork-tender, 2-1/2 hours, turning halfway through.
Browned 1st Batch
Garlic Added
Pork Ready to Braise
Pork Halfway Through
  1. Transfer the pork to a plate. (Leave the oven on.) When the pork is cool enough to handle, pull the meat into shreds.
Braised Pork 
Pulled Pork
  1. Increase the oven temperature to 350° F and line a large baking sheet with foil.
  2. Place the hollowed-out rolls on the baking sheet and fill the bottom halves with pulled pork. Spoon a generous amount of ranchero sauce on top.
  3. Divide the cheese on top of the pork and sauce. Place the tops on the sandwiches and bake until the cheese has melted and the rolls begin to brown, about 5 minutes, depending on your oven.
Pork-Filled Roll
Ranchero Sauce Added 
Cheese Added
Slice each baked roll in half on the diagonal serve hot.

Slow-Cooked Pork Rolls with Ranchero Sauce